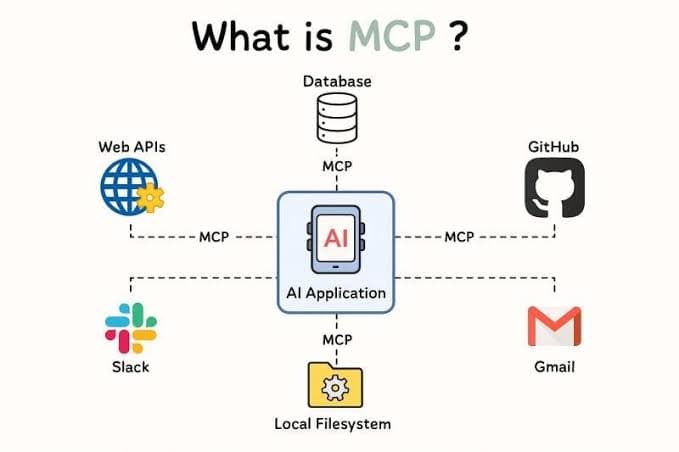
Connect IWAS to AI Agents with MCP and OAuth 2.1
Short answer: there are two ways to connect IWAS to an AI app. Remote MCP: add
https://getiwas.com/mcpto your AI app, it opens the IWAS sign-in page (OAuth 2.1), you approve, and the AI app keeps the token. stdio: runnpx -y @iwas/mcp loginonce in a terminal (Device Flow, you enter a code in your browser), the token is stored in your OS keychain or a protected file, and your AI app runsnpx -y @iwas/mcp mcp. The AI can only do what your IWAS account is allowed to do. To disconnect a machine, runnpx -y @iwas/mcp logout.
IWAS is guest WiFi management software for cafes: guests get online through a login page (captive portal), the cafe sets its own plans by time, speed and data, and guests can buy more time with VietQR through the cafe's own PayOS account. IWAS works with MikroTik (RouterOS v7 or newer), OpenWrt and UniFi routers. Learn more about IWAS.
You should not need to create an API key and copy it into every AI client just to use IWAS.
IWAS MCP is designed around a Remote MCP Server with authorization through OAuth 2.1. Client discovery, authorization, access tokens, and refresh tokens can be handled through the standard OAuth/MCP flow instead of creating a separate authentication integration for every AI platform.
This guide focuses on how an end user connects IWAS, rather than how to build a custom MCP app or manually create an OAuth client for every platform.
The basic idea: provide the IWAS MCP endpoint to the AI client → the client discovers the OAuth capabilities → the browser opens for IWAS login → the user grants access → the client manages the resulting tokens and uses IWAS MCP.
New: besides remote MCP over HTTP, IWAS now has the
@iwas/mcppackage, which runs over stdio right on your machine and signs in with OAuth Device Flow (you enter a code in your browser). It's a good fit for Claude Desktop, Cursor, Antigravity, VS Code (Cline / Roo Code) and Windsurf. See sections 12, 13 and 14.
1. What do you need?
To connect over remote HTTP, you need:
- An IWAS account with permission to use the required tools.
- The IWAS Remote MCP URL. For IWAS cloud, that's
https://getiwas.com/mcp. - An AI client that supports remote MCP and OAuth.
To connect over stdio with the @iwas/mcp package, you need:
- An IWAS account, as above.
- Node.js 18 or newer on your machine (the README recommends Node.js 20+).
- An AI client that runs MCP servers over stdio, such as Claude Desktop, Cursor, Antigravity or VS Code (Cline / Roo Code).
You should not put your IWAS password, access token, or refresh token into a prompt.
The IWAS authorization server handles authentication and authorization; the AI client receives the credentials/tokens it needs after the user completes authorization.
2. How does the OAuth 2.1 flow work?
At a high level:
AI Client
   │
   │  Connect to IWAS MCP
   ▼
IWAS MCP Server
   │
   │  OAuth discovery
   ▼
IWAS Authorization Server
   │
   │  Browser login + consent
   ▼
User
   │
   │  Authorize
   ▼
Access Token / Refresh Token
   │
   ▼
AI Client ───────────────► IWAS MCP
The important part is that the AI client does not need to know IWAS's database or internal APIs. It communicates with the MCP server and the OAuth authorization server.
For remote MCP, current Cursor documentation describes OAuth support for remote SSE and Streamable HTTP servers. Antigravity can automatically handle OAuth for MCP servers that support Dynamic Client Registration.
3. Connect IWAS to ChatGPT
In ChatGPT, start from Apps / connected apps available to your account or workspace.
If IWAS is already distributed in the app/connector list:
- Open ChatGPT.
- Open Apps or the connected-app management area.
- Find IWAS.
- Select Connect.
- ChatGPT starts the IWAS authorization flow.
- Sign in to IWAS.
- Review the requested permissions.
- Select Authorize / Allow.
- Return to ChatGPT and use IWAS in your conversation.
You do not need to create a “custom MCP app” just for an end user to connect IWAS when IWAS is already distributed as an app/connector.
OpenAI currently uses Apps as the integration surface in ChatGPT. Custom MCP apps are a mechanism for building and testing apps through Developer Mode; they are not the required end-user setup step for an already distributed integration.
After connecting
Try prompts such as:
“Check IWAS health and summarize today's active WiFi sessions.”
Or:
“Summarize today's revenue from IWAS.”
ChatGPT uses the connected app/tools according to the permissions granted to the account.
Note: menu names and locations can change across ChatGPT versions, plans, and workspaces. The important part is the OAuth authorization flow, not the exact label of a button.
4. Connect IWAS to Claude
For Claude environments that support remote MCP connectors, add IWAS as a remote connector and complete its OAuth flow.
The typical flow is:
- Open Claude's Connectors settings.
- Choose the option to add a custom/remote connector if available.
- Enter the IWAS Remote MCP URL.
- Start the connection.
- Claude opens the IWAS OAuth authorization page.
- Sign in to IWAS.
- Review and authorize the requested permissions.
- Return to Claude and enable IWAS when needed.
The principle is the same: remote MCP endpoint + OAuth authorization, rather than copying an IWAS API token into the client.
Using Claude Desktop? It can run IWAS over stdio with
npx -y @iwas/mcp mcp. See theclaude_desktop_config.jsonexample in section 12.
5. Connect IWAS to Cursor
Cursor supports remote MCP through SSE and Streamable HTTP, with OAuth support for remote MCP servers. Cursor also supports one-click MCP installation and remote server configuration through mcp.json.
The easiest path
If IWAS is available through the Cursor Marketplace or has an installation deep link:
- Open Cursor.
- Open Customize / MCP.
- Find IWAS.
- Select Add to Cursor / Install.
- Select Connect when Cursor requests authentication.
- Your browser opens the IWAS OAuth flow.
- Sign in to IWAS.
- Review and authorize access.
- Return to Cursor.
Cursor can then use the resulting OAuth authorization for requests to IWAS MCP.
Manual remote MCP configuration
Cursor supports project-level .cursor/mcp.json and global ~/.cursor/mcp.json configuration.
{
  "mcpServers": {
    "iwas": {
      "url": "<IWAS_REMOTE_MCP_URL>"
    }
  }
}
After adding the server, open MCP settings and authenticate/connect when Cursor prompts you.
Do not hard-code an access token into mcp.json when IWAS OAuth is available.
Prefer running IWAS over stdio in Cursor? See the
npx -y @iwas/mcp mcpconfig in section 12.
Static OAuth is a fallback
Cursor also supports static OAuth client credentials in mcp.json. This is intended for cases where an MCP provider gives you a fixed Client ID/Secret, requires a pre-registered redirect URI, or does not support Dynamic Client Registration. When the server supports dynamic registration, let Cursor perform the standard OAuth flow instead of making users manage client secrets manually.
6. Connect IWAS to Google Antigravity
Google Antigravity supports remote MCP and has built-in OAuth handling.
According to the official Antigravity MCP documentation, a remote MCP server can be configured with serverUrl. When the server supports Dynamic Client Registration, Antigravity can handle OAuth without manually supplying client credentials.
Add IWAS
In Antigravity:
- Open Settings.
- Go to Customizations.
- Open MCP / Installed MCP Servers.
- Install IWAS from the MCP Store if it is available there.
- If IWAS is not in the store, open MCP Servers → Manage MCP Servers → View raw config.
- Add IWAS as a remote MCP server using its
serverUrl.
Example:
{
  "mcpServers": {
    "iwas": {
      "serverUrl": "<IWAS_REMOTE_MCP_URL>"
    }
  }
}
Antigravity supports serverUrl for remote Streamable HTTP/SSE servers.
Authenticate IWAS
Once the server appears:
- Open Agent Settings → Customizations.
- Find IWAS.
- Select Authenticate.
- The browser opens the OAuth authorization flow.
- Sign in to IWAS.
- Grant access.
- Complete the authorization flow shown by Antigravity.
Antigravity stores OAuth tokens and automatically refreshes expired tokens. Its official documentation describes the Authenticate → browser authorization → submit authorization code flow.

Example of Antigravity's Authenticate interface from Google's documentation.
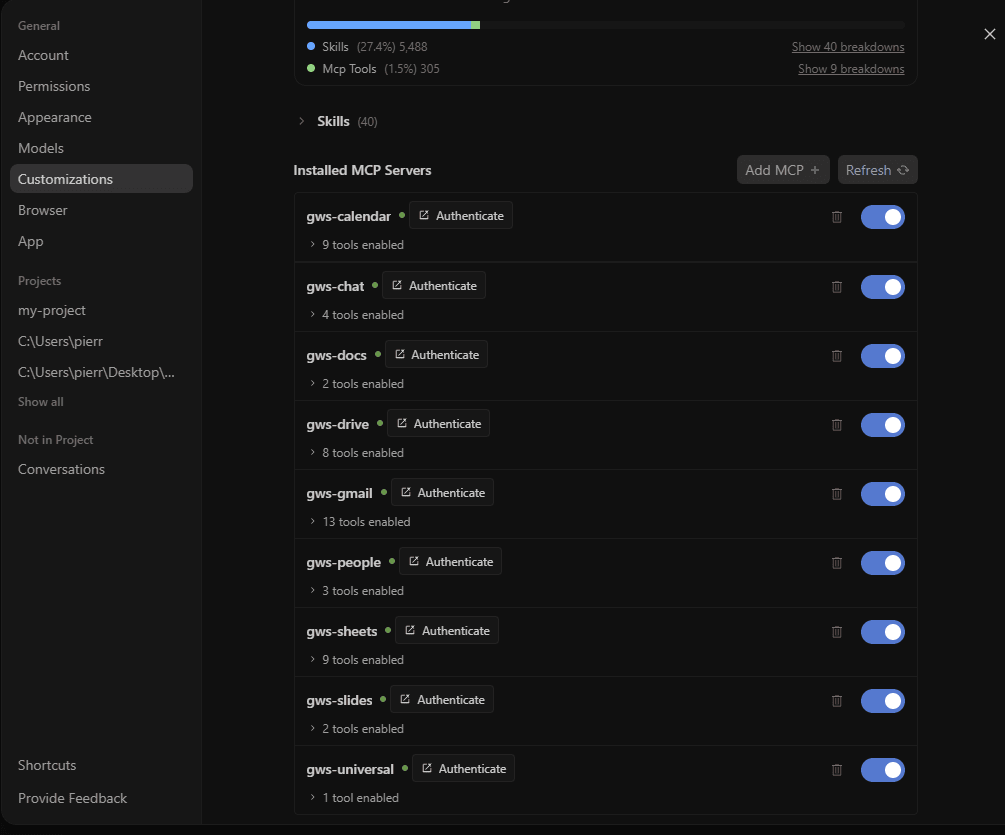
Antigravity showing installed MCP servers and their authentication state.
Antigravity can also run IWAS over stdio through
mcp_config.json. See section 12.
7. Why OAuth instead of an API key?
There is a fundamental difference between the two approaches.
API key
User → copy secret → AI client → IWASThe user has to manage the secret and may accidentally expose it in configuration, prompts, logs, or source code.
OAuth 2.1
User → Connect
          ↓
       IWAS Login
          ↓
       Authorize
          ↓
    Token managed by client
The AI client does not need the user's password, and the user can review the requested access before granting it.
This model also works better when the same IWAS account is used from multiple AI clients.
8. CIMD, DCR, OAuth, and MCP — how do they fit together?
These terms are related, but they are not the same thing.
| Component | Role |
|---|---|
| OAuth 2.1 | Authorization framework used to grant client access on behalf of a user |
| DCR | Allows an OAuth client to register dynamically with the authorization server |
| CIMD | Lets a client provide metadata through a Client ID Metadata Document |
| Device Flow | OAuth sign-in for apps running on your machine (CLI, stdio): the app shows a code, you open a browser, enter it and approve (RFC 8628) |
| MCP | Protocol used by AI clients to communicate with tools and resources |
A simplified IWAS flow looks like:
AI Client
   │
   ├── MCP discovery
   │
   ├── OAuth metadata discovery
   │
   ├── Client registration
   │      └── DCR / CIMD when supported
   │
   ├── Authorization
   │      └── User login + consent
   │
   └── MCP requests with access token
Where does device flow fit in?
DCR and CIMD answer the question "who is this client?". Device flow answers a different one: "how does the user sign in when the app runs in a terminal and can't open a login page and receive the result itself?"
Both sit under OAuth; they just take different paths:
Remote HTTP (the AI client handles OAuth)
AI Client ── DCR / CIMD ──► Authorization (browser) ──► Token ──► https://getiwas.com/mcp

stdio (@iwas/mcp handles OAuth for the client)
iwas login ── Device Flow (code + browser) ──► Token stored in the keychain
AI Client ──stdio──► @iwas/mcp ──HTTPS + token──► https://getiwas.com/mcp
With stdio, @iwas/mcp uses its own built-in client ID (iwas-cli), so you don't register a client or keep a client secret. The AI client just runs npx -y @iwas/mcp mcp, and @iwas/mcp holds and refreshes the token.
Every request from @iwas/mcp to IWAS also carries a fresh DPoP proof (RFC 9449). Put simply, the token is tied to a private key on your machine, so even if someone got hold of the token, it would be hard to use it anywhere else.
This is what lets IWAS expose one standardized authentication model to many different AI clients.
9. The IWAS Remote MCP URL is the main configuration input
For remote HTTP, a modern integration should keep configuration minimal (for IWAS cloud, the URL is https://getiwas.com/mcp):
IWAS Remote MCP URL
        ↓
AI Client
        ↓
OAuth discovery
        ↓
IWAS Authorization
        ↓
Connected
You should not need to:
- Copy your password into an AI client.
- Paste an access token into a prompt.
- Commit a refresh token to Git.
- Create a separate API key for every user when OAuth is available.
If a client requires static OAuth credentials because it does not support dynamic registration, that is a client-specific fallback — not the preferred end-user flow.
For stdio, all you provide is the npx -y @iwas/mcp mcp command and the IWAS_SERVER_URL variable (it already defaults to https://getiwas.com). Details in section 12.
10. After connecting, IWAS becomes an AI-accessible platform
Once OAuth is complete, the AI client can call the MCP tools the user is authorized to use.
For example:
Operations
“How many active sessions are there in IWAS right now?”
Analytics
“Summarize WiFi package performance over the last 7 days.”
Troubleshooting
“Check recent MCP errors.”
Audit
“Show audit events related to this integration.”
The AI does not need direct access to the IWAS database. MCP becomes the standardized interface between the AI client and the IWAS platform.
11. Build MCP once, connect many AI clients
The important architectural benefit is that IWAS does not need a separate authentication system for every AI product.
┌── ChatGPT Apps
                    │
IWAS MCP + OAuth ───┼── Claude
                    │
                    ├── Cursor
                    │
                    ├── Antigravity
                    │
                    ├── Claude Desktop, VS Code… (stdio + @iwas/mcp)
                    │
                    └── Other MCP Clients
Each client has a different UI, but IWAS can expose the same MCP endpoint and authorization model.
One MCP server. One OAuth security model. Many AI clients.
12. Connect IWAS over stdio with @iwas/mcp
In short: with stdio, IWAS does not sign you in when your AI app starts. You run
npx -y @iwas/mcp loginonce in a terminal first, then use the app. Just 3 steps:
npx -y @iwas/mcp login: sign in with Device Flow (enter a code in your browser).npx -y @iwas/mcp status: check that you're signed in.- Configure your AI app (Claude Desktop, Cursor, Antigravity…) to run
npx -y @iwas/mcp mcp.
Many desktop AI apps (Claude Desktop, Cursor, Antigravity, VS Code with Cline / Roo Code, Windsurf) like to run an MCP server as a small local program and talk to it over stdio. For that case, IWAS ships an official package: @iwas/mcp.
Think of it as a small bridge:
AI Client ──stdio──► @iwas/mcp (on your machine) ──HTTPS──► https://getiwas.com/mcpYou don't need to clone a repo or pre-install anything. You just need Node.js 18+ and npx.
Step 1: Sign in once
Open a terminal and run:
npx -y @iwas/mcp loginThis opens your browser so you can sign in to IWAS with Device Flow (see section 13 for how it works). Once you're done, the token is stored securely on your machine, so you never paste a token anywhere.
If you're on an SSH session or a machine without a browser:
npx -y @iwas/mcp login --no-browserThe command then just prints a verification URL and a user code, and you open that link on your phone or another computer to approve.
Step 2: Check that you're signed in
npx -y @iwas/mcp statusIt shows the active profile, the server, the status (🟢 Active or expired) and how long the token has left.
Step 3: Add IWAS to your AI client
The clients below all use the same kind of config: run npx -y @iwas/mcp mcp and set IWAS_SERVER_URL. Make sure you've done Step 1 before you launch the client.
Claude Desktop (claude_desktop_config.json)
- macOS:
~/Library/Application Support/Claude/claude_desktop_config.json - Windows:
%APPDATA%\Claude\claude_desktop_config.json
{
  "mcpServers": {
    "iwas": {
      "command": "npx",
      "args": ["-y", "@iwas/mcp", "mcp"],
      "env": {
        "IWAS_SERVER_URL": "https://getiwas.com"
      }
    }
  }
}
Cursor (.cursor/mcp.json or the global MCP settings): use the same JSON as above.
Antigravity (~/.gemini/config/mcp_config.json or .agents/mcp_config.json): same JSON as above.
VS Code with Cline / Roo Code (cline_mcp_settings.json): same JSON again.
Save the file, restart the client, and IWAS shows up in the tool list.
Handy commands
The package ships two identical commands, iwas and iwas-mcp. If you've installed the package, iwas is shorter to type; otherwise just keep using npx -y @iwas/mcp as above.
| Command | What it does |
|---|---|
login | Sign in with OAuth Device Flow |
status | Show the sign-in status of a profile |
logout | Revoke the session on the server and delete the local token |
mcp | Run the stdio bridge for your AI client |
help | Show help |
A few options documented in the README:
login --scopes "analytics:read session:read offline_access": request only the permissions you need.login --json,status --json: machine-readable JSON output for scripts.logout --force: clean up the local token even if the server can't be reached.--server <url>: point at a different IWAS server (for example a self-hosted one).
Note: don't add
--jsonto themcpcommand. It reserves stdout for MCP (JSON-RPC) frames, so it will error if you pass--json.
Environment variables
| Variable | Default | Meaning |
|---|---|---|
IWAS_SERVER_URL | https://getiwas.com | Address of the IWAS server |
IWAS_MCP_VAULT | auto | Where tokens are stored: auto (OS keychain, falling back to a file), keychain (keychain only), file (file only) |
XDG_CONFIG_HOME | ~/.config | Base folder for the fallback token file ($XDG_CONFIG_HOME/iwas/credentials.json) |
Common errors
No IWAS credentials for profile "...": this machine hasn't signed in yet. Runnpx -y @iwas/mcp login.fetch failed: connection closedorECONNREFUSED: the server inIWAS_SERVER_URLcan't be reached. Check your connection or the server address.- macOS asks for Keychain access: click Always Allow. Or set
IWAS_MCP_VAULT=fileto store the token in a file instead. The mcp command reserves stdout for MCP frames; --json is not supported: you passed--jsonto themcpcommand. Drop--jsonand it runs.- The AI app says you're not authenticated: run
npx -y @iwas/mcp status, thennpx -y @iwas/mcp loginagain and restart the app.
13. Device flow: sign in to IWAS with a code in your browser
In short: Device Flow runs in your terminal, not inside the AI app or the chat. You type
npx -y @iwas/mcp loginonce, approve the code in your browser, then check withnpx -y @iwas/mcp status. After that, the AI app just runsnpx -y @iwas/mcp mcpand uses the token stored on your machine.Common misunderstandings: sign-in does not happen automatically when the AI app starts; the token is not "PKCE encrypted" (it's kept in Keychain / Secret Service / a protected local file, and every request carries a DPoP proof); and there is no tool you can ask the AI to call in chat to log you in.
Device flow (formally the OAuth 2.0 Device Authorization Grant, RFC 8628) is the same kind of sign-in you see when you log in to Netflix or YouTube on a TV: the screen shows a code, you open a browser, enter the code and approve.
With @iwas/mcp, it goes like this:
- You run
npx -y @iwas/mcp login. - The terminal shows a USER CODE and a verification link, and opens your browser automatically (unless you used
--no-browser). - You sign in to IWAS in the browser as usual, check the code and approve.
- Meanwhile the terminal waits ("Waiting for approval in browser..."). As soon as you approve, it receives the token.
- The token is stored in your operating system's secure storage.
iwas login ──► IWAS issues a USER CODE + link
     │
     │  you open the link, sign in, approve
     ▼
IWAS ──► access token + refresh token ──► keychain on your machine
Where is the token stored?
- macOS: Apple Keychain.
- Linux: Secret Service (libsecret).
- Windows, Docker or headless machines: the file
~/.config/iwas/credentials.json, readable only by your user (0600permissions).
What happens when the token expires?
Nothing you need to do. @iwas/mcp refreshes the token before it expires and retries automatically on an HTTP 401. If you have several IDE windows or agents running at once, the package uses a file lock so their refreshes don't step on each other.
Want to sign out?
npx -y @iwas/mcp logoutThis revokes the session on the IWAS server and removes the token from your machine. Tokens and secrets are also redacted from logs and error messages.
14. stdio or remote HTTP: which should you use?
Both use the same IWAS permission system. The difference is who handles the sign-in.
| Remote HTTP | stdio (@iwas/mcp) | |
|---|---|---|
| What you connect to | https://getiwas.com/mcp | The npx -y @iwas/mcp mcp command running locally |
| Who handles OAuth | The AI client (DCR / CIMD) | @iwas/mcp, signing in with Device Flow |
| What you install | Nothing | Node.js 18+ |
| Where the token lives | Inside the AI client | Your OS keychain / a protected local file |
| Good fit for | ChatGPT, cloud agents, webhooks, clients that support Streamable HTTP | Desktop AI apps: Claude Desktop, Cursor, Antigravity, VS Code (Cline / Roo Code), Windsurf |
The short version:
- Your client can add a remote MCP URL and handle OAuth itself → use remote HTTP, nothing to install.
- Your client only runs MCP servers as a command (stdio), or you want the token kept in your machine's keychain → use
@iwas/mcp.
15. FAQ
How is OAuth 2.1 (remote) different from Device Flow (stdio)?
Both are OAuth; the difference is who handles sign-in. With remote, the AI app connects straight to https://getiwas.com/mcp, opens the IWAS sign-in page and keeps the token itself. With stdio, the @iwas/mcp package signs you in with Device Flow (RFC 8628): run npx -y @iwas/mcp login, enter the code in your browser, the token is stored on your machine, and the AI app runs npx -y @iwas/mcp mcp. If your app can add a remote MCP URL, use remote; if it only runs MCP servers as a command, use stdio.
Does IWAS MCP support stdio?
Yes. Use the @iwas/mcp package: run npx -y @iwas/mcp login once, then configure your AI client to run npx -y @iwas/mcp mcp.
Where is the IWAS token stored?
With stdio, @iwas/mcp stores the token in Apple Keychain (macOS, service name iwas-cli) or Secret Service/libsecret (Linux); on Windows, Docker or headless machines it uses ~/.config/iwas/credentials.json, readable only by your user (0600). You can choose with the IWAS_MCP_VAULT variable (auto, keychain or file). With remote, the AI app keeps the token after you approve access. You never need to paste a token into a config file or a chat.
What can the AI do in IWAS? How do account permissions work?
The AI can only call the tools that the IWAS account you signed in with is allowed to use. Whether you connect through the stdio package @iwas/mcp or remote HTTPS /mcp, both use the same role-based access control (RBAC), so an AI client only gets the permissions of the signed-in account's role, nothing more. Some diagnostic tools (for example system logs and error lists) are limited to IWAS platform staff. With stdio you can ask for fewer permissions when you sign in, for example npx -y @iwas/mcp login --scopes "analytics:read session:read offline_access". npx -y @iwas/mcp status shows which organization you are signed in to.
How do I disconnect or revoke access?
With stdio, run npx -y @iwas/mcp logout: it revokes the session on the IWAS server (RFC 7009) and deletes the token from your machine. If the server can't be reached, npx -y @iwas/mcp logout --force at least removes the local token. With remote, remove or disconnect IWAS in that AI app's MCP / connected apps settings. You can also revoke the OAuth access you granted to remote MCP from the IWAS system admin.
Sign-in failed. What should I check?
No IWAS credentials for profile: the machine isn't signed in yet, run npx -y @iwas/mcp login. fetch failed or ECONNREFUSED: the server in IWAS_SERVER_URL can't be reached, check your connection or the server address. macOS asks for Keychain access: click Always Allow, or set IWAS_MCP_VAULT=file. An error about --json on the mcp command: drop --json. The AI app says you're not authenticated: run npx -y @iwas/mcp status, then npx -y @iwas/mcp login again and restart the app.
Can I log in from inside Claude Desktop or Cursor?
No. The MCP server does not log you in from inside the app or the chat. Run npx -y @iwas/mcp login in a terminal first. If the app says you're not authenticated, run npx -y @iwas/mcp status to see what's going on, then run npx -y @iwas/mcp login again and restart the app.
Do I need to sign in again when the token expires?
Usually not. @iwas/mcp refreshes the token before it expires and retries automatically on a 401. You can check with npx -y @iwas/mcp status.
What is the IWAS remote MCP URL?
For IWAS cloud it is https://getiwas.com/mcp (Streamable HTTP).
Further reading
- Presence Intelligence: what can WiFi tell businesses about customer presence?: the WiFi data an AI can help you read once IWAS is connected.
- Automated WiFi voucher issuance API integration guide: if you want your POS/CRM to issue WiFi discount codes automatically instead of asking an AI.
Official documentation
- OpenAI — Apps / MCP in ChatGPT
- Cursor — Model Context Protocol
- Google Antigravity — MCP
- IWAS — the @iwas/mcp package on npm
This guide prioritizes OAuth (remote MCP + OAuth, or stdio + Device Flow). API keys and static OAuth credentials are mentioned only as fallbacks when a particular client or environment requires them.
Quick summary
| Client | Remote MCP | stdio (@iwas/mcp) | Connection flow |
|---|---|---|---|
| ChatGPT | ✓ | – | Apps / connected app → Connect → OAuth |
| Claude | ✓ | ✓ | Remote connector → Connect → OAuth, or Claude Desktop with npx -y @iwas/mcp mcp in claude_desktop_config.json |
| Cursor | ✓ | ✓ | Remote MCP → Authenticate, or stdio npx -y @iwas/mcp mcp |
| Antigravity | ✓ | ✓ | MCP Servers → Authenticate, or stdio in mcp_config.json |
| VS Code (Cline / Roo Code) | – | ✓ | login → add to cline_mcp_settings.json |
A "–" means this guide doesn't cover that path yet, not that the client can't do it.
If IWAS appears in a client's app or MCP directory, use the one-click connection. Otherwise, add the Remote MCP URL (https://getiwas.com/mcp) and let the client perform OAuth discovery and authorization. If your client runs MCP over stdio, run npx -y @iwas/mcp login once and point the client at npx -y @iwas/mcp mcp.
Don't have an IWAS account yet? Create a workspace at getiwas.com to start a 14-day trial.
You should not need a different authentication architecture for every AI client — that is the value of building IWAS on standard MCP and OAuth.